Managing folders
The User Portal provides access to your site's file system through a folder tree displayed on the left side of the page. After initial account setup, three default folders are created: Home, Outbox, and Shared Files. These folders serve specific purposes in organizing and managing your files.
-
Home - Includes My Documents and My Dropbox folders for each user. You can view all the files and folders of each user and set up links to each user's Dropbox folder so they can securely receive large files from external users.
-
Outbox - Stores files sent from a user's local system via the MFT Add-in for Outlook or the Upload window during a web portal email distribution.
-
Shared Files - Store and organize content that is accessible to multiple users and groups. For more information, refer to Adding Folders and Adding users and groups to folders.
Administrators in the Administrators group have unrestricted access to all folders created in the MFT web portal.
Adding folders
Organize your site's content efficiently by creating department or project-specific folders within the Shared Files directory.
-
Log in to your File Sharing site.
-
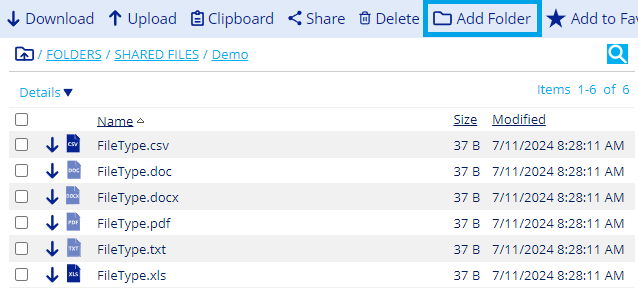
Click the default folder in which you want to add a new folder, then click Add Folder.
-
Enter the folder name and a description and then click Save.
Adding users and groups to folders
You can provide folder access to users and groups in your File Sharing site. Access to a folder provides visibility to all its contents, including sub-folders.
- Adding groups to folders is ideal when you need to add whole departments, project teams, or large groups of people to the same folders and want them to have equal access rights.
- Adding individual users to folders is ideal when you want to give customized access rights to a few individuals or have content that only a few individuals should have access to.
For example, if you want to give everyone on your site access to multiple folders, add the default group called EVERYONE to each folder.
-
Select the folder to which you want to add access and click the Access tab from the Folder Details panel.
-
Click Modify to provide access to additional users or groups.
-
Select Users or Groups in the search bar and click Search.
A list of all users or groups in your File Sharing site displays with different access rights options (Read, Create, Delete, Modify, Download, Send, and Manage). Click Access Tips next to the Save button to view more information about each option.
-
Select the checkbox next to the user or group to choose all options or select checkboxes individually to control which access rights you want the user or group to have.
-
Click Save.
When users and groups are added to a folder, the changes reflect in the Access tab.
You can remove users or groups by selecting the checkbox next to the user or group you want to remove, and then click Remove.
Access options
- Read - Ability to "see" the folder and contents only, no other actions allowed.
- Create - Includes Read and the ability to upload files to the folder only.
- Modify - Includes Read and the ability to overwrite existing files.
- Download - Includes Read and the ability to download files only.
- Share - Includes Read and the ability to send files via Distribution and share files via direct link.
- Manage - Includes Read and the ability to grant or restrict other users' access to the selected folder.
- Delete - Includes Read and the ability to delete the folder and its contents and to cut and move the folder to other folders.
Any access setting can be combined with any or all of the other settings.
Renaming folders
You can rename the default folders or any sub-folders.
Renaming a shared folder affects all users with access. Renaming a default folder applies site-wide and can only be updated by Administrators. Users can rename only their personal folders and those they have permission to modify.
-
Select the folder you want to rename and click Summary from the Folder Details panel.
-
Click Modify and then enter the new name of the folder. You can also edit or add a description.
-
Click Save.
